In this article we are going to talk about the pleasant subject of dumping your waste tanks. Some of what I will tell you about applies basically to all RVs and some applies only to Roadtreks since Roadtrek added the macerator dump system as standard equipment in all models. I will first start with the basics.
The Roadtrek has two separate waste tanks. One is called the Black Tank - and has "black water" in that tank. This is the tank that is connected only to your toilet. Everything that goes into the toilet is dropped down into the Black Tank. The other tank is called the Grey Tank and has "grey water" in it. This is the tank that is connected to your sink drain(s Roadtreks that have the enclosed bathroom option also have a bathroom sink) and your shower drain. This is water will be clean water that has flowed down the drain and also water from washing your hands, washing dishes, and taking a shower. This water is likely to have soap mixed in. The Roadtrek has a 23 gallon grey tank and a 10 gallon black tank - yes, the black tank holds only ten gallons of water mixed with waste. The grey tank size will vary with model. All models except the 170 have a ten gallon black tank (the 170 black tank is only 8 gallons).
Once those tanks fill up you need a way to empty them and that is called "dumping" your tanks. The traditional RV has a gravity dump system. With this system a three inch wide hose is connected to a connector that is part of two valves that open and close the tanks. The other end of that hose is put into a hole in the ground that leads to a sewer and by gravity, when the valves are opened one at a time the waste and water flow out through the hose from the tanks and go down into the sewer. The process can take a bit of time and requires that there be sufficient height from the bottom of the tanks where the valve enters each tank for gravity to be able to work to carry the waste and water out. Older Roadtreks have this system. Newer Roadtreks do not.
Newer Roadtreks have a MACERATOR. A macerator is an electric pump with a grinder attached. It is very much like a sink garbage disposal system. The macerator is connected to two pipes that each are connected to a valve that goes into the black tank and the grey tank. Inside the macerator is an impeller that spins pumping the water from the tank into the macerator and also a pair of stainless steel very sharp cutting blades. All of the waste the comes into the macerator with the water is ground up into liquid by the spinning cutting blades - think of a blender or food processor. That thin solution is then pushed through a flex hose that is about one inch in diameter and out a nozzle into the sewer hole. The process is quick and relatively odorless - unless you stick your nose into the sewer hole. There is a momentary switch that turns the macerator on and off - push the switch - on - let go of the switch - off. This switch is located inside the driver's door and on the newer Roadtreks it is a red button on the frame of the driver's seat facing out the door. The macerator enables the Roadtrek which is close to the ground to pump the waste and water out of the tanks with little gravity and it can even push the waste uphill if that is where the sewer hole is. Roadtrek felt that this is the better system for a Class B that is so close to the ground on the bottom.
Which system is better? There are a lot of strong opinions on this. There are positives to be said for both systems. The one reason that makes sense more than others about the traditional gravity system being better is that since it is not mechanical in any way, there is very little that can go wrong with the system. You don't need electricity (the macerator will work with either the coach battery(ies) or 120 volt hook up). Not much can clog a three inch hose. And you can always add a portable macerator to the end of a gravity hose to do the same job as the built in Roadtrek macerator. More importantly, you are not dealing with a motor that can break or an impeller that can get jammed from waste or hair that may have gone down the drain. It may sound like I don't like the macerator in my Roadtrek - and that is not true. I like how fast it empties the tanks and I also know that the way some campground sewer connections are and some dump stations can be, the fact that the macerator can move the water without gravity can be an advantage. I am not going to go into the things that people say about the macerator system in general. I will tell you that the macerator's number one enemy is HAIR. Put good hair screens on all of your drains and do not allow hair to flow down the drains. Think of a vacuum cleaner whose rotating brushes pick up hair on the floor and twist that hair around the brush until it cannot turn any more. This is exactly what hair COULD do to a macerator impeller. If you are careful you are fine.
It is important to understand one other thing that the difference between a macerator system and a gravity system effects. With a gravity system you could connect your dump hose to the sewer connection at the campground and open the grey valve (it is generally recommended not to do this with the black valve for the black tank) and let all of the grey water go into the tank and then right out again into the sewer. This permits endless showers, washing, etc. The grey tank never fills up and it empties all of the time when water goes in and you are hooked up. You will see RVs do this all the time at campgrounds.
YOU CANNOT DO THIS WITH THE ROADTREK MACERATOR SYSTEM. With the macerator the tank only empties when you push and hold in the button. No water will flow through on its own. So you must rely upon your tank to hold the water that goes down the sink and shower drains and then empty it when it is full.
OK - now the fun part - the how to do it. Well, you know how to do it. You have been doing it since you were born. Now you will learn how to get rid of it in a Roadtrek.
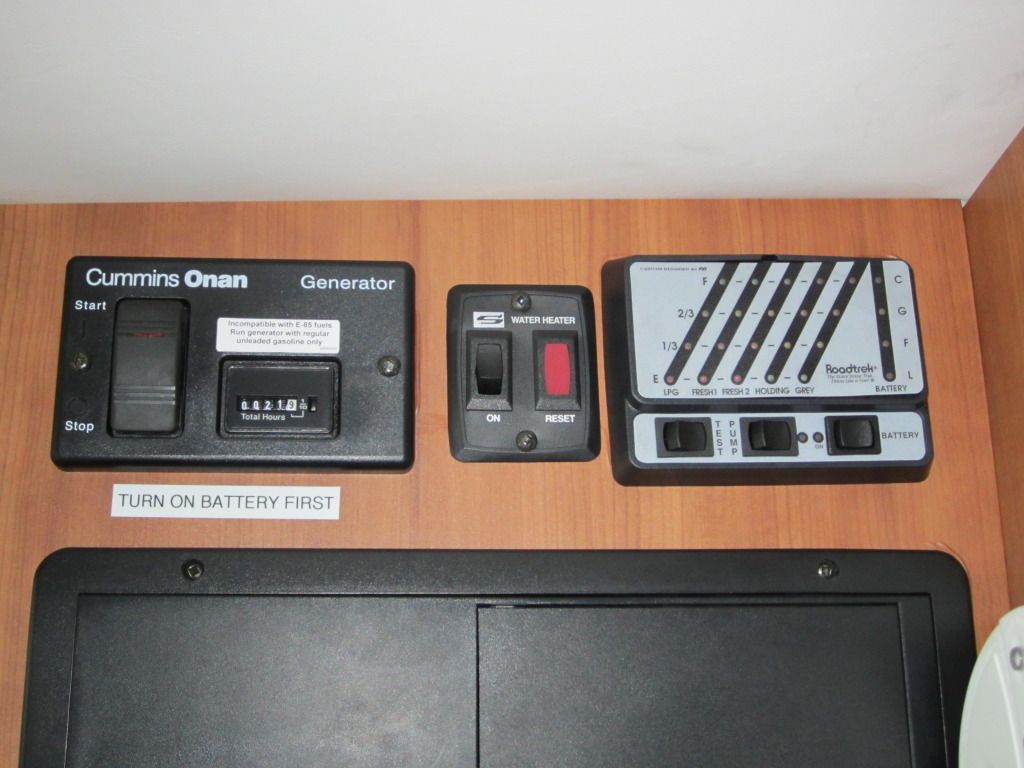
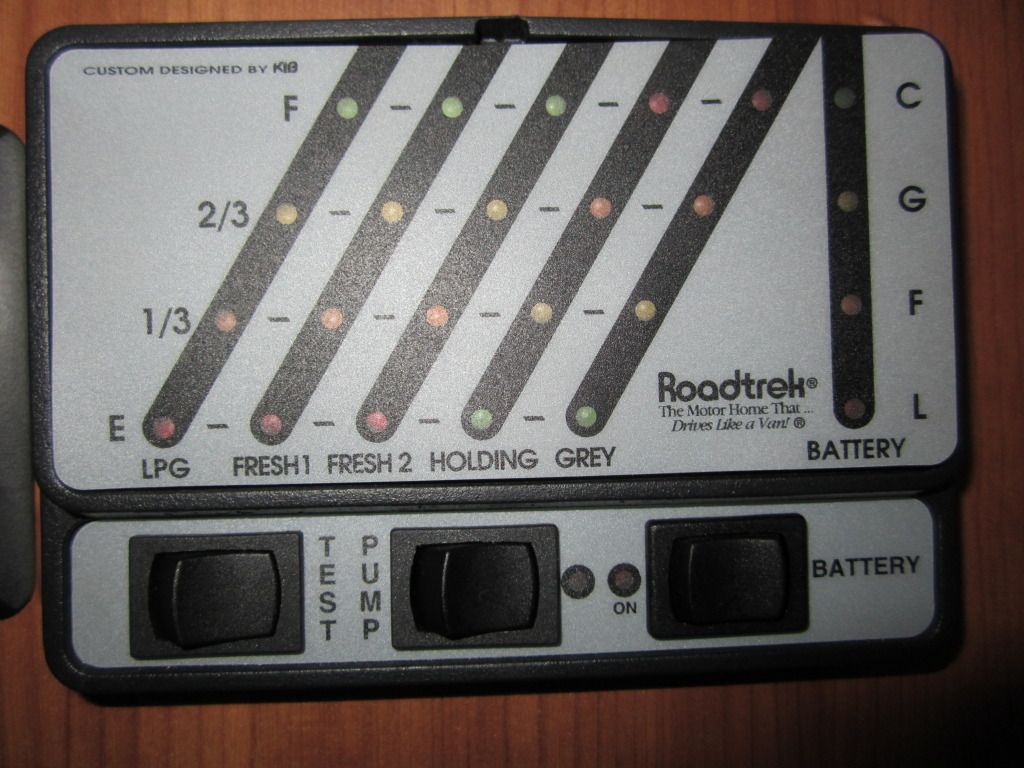
Before you can dump the waste tanks, each tank must be at least 2/3 full. The 2/3 indicator for each tank is on the monitor panel inside your Roadtrek. It is the next to last light from the top - the top light is full (which is OK to dump at too). If you want to dump and you don't have that much in your tanks, put some more in. Open the faucet and let the water run into the grey tank and flush the toilet until you have enough water in the black tank. I use a gallon water jug that we carry and I go out to the hose faucet on the campground site and fill it and dump it down the toilet until we reach 2/3 or full. Once you get enough into the tanks you can start to dump them.
First, you must have electrical power on - either your coach batteries or 120 volt power (hookup or generator). Make sure your Battery Disconnect switch is ON - red light is lit. If I am not connected to 120 volt power I like to start the van engine just to give the macerator motor a little extra umpf to work.
Open the side compartment where your macerator is located. On my 190 it is a lift up door for the side storage compartment. Also open the door - on mine - next to the storage compartment to the front of the van - to access the grey and black tank handles.
![]()
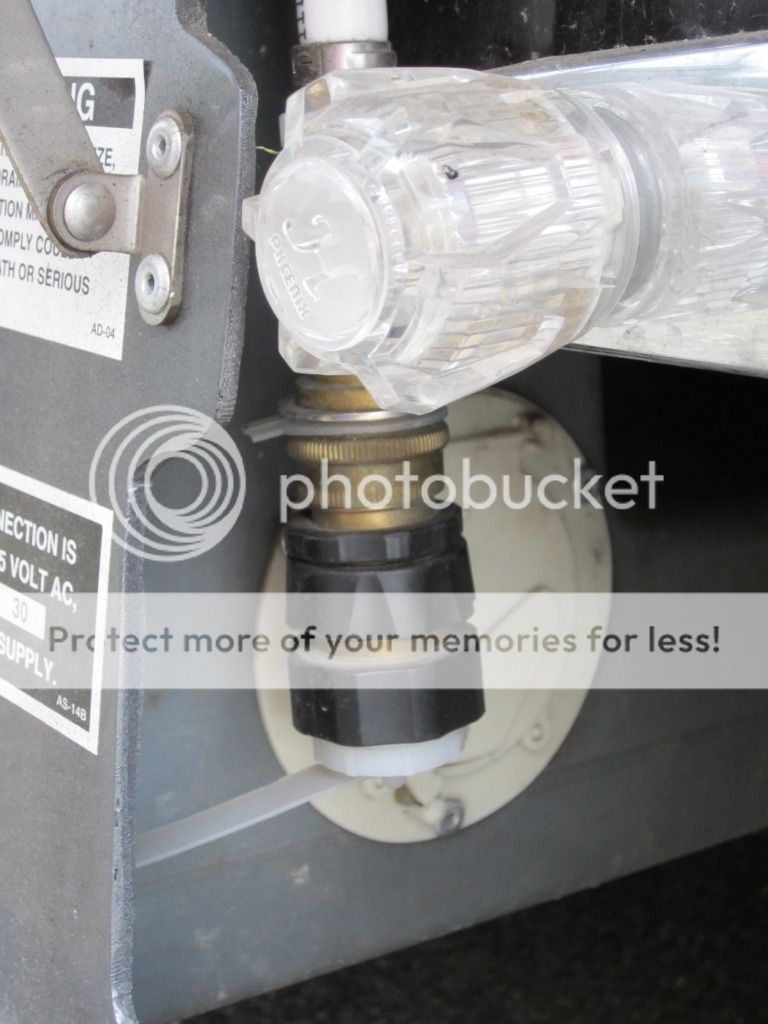
You pull the hose out of its compartment, nozzle first. It has worked best when the entire hose is removed from the compartment until it reaches its full length. This hose is connected under your Roadtrek to the macerator. Don't pull once the hose stops coming out! In the photo above you see the green hose with the white and grey nozzle. The black handle on the top is a valve to stop the water from coming out of the nozzle. Open the driver's door to get to the macerator power button.
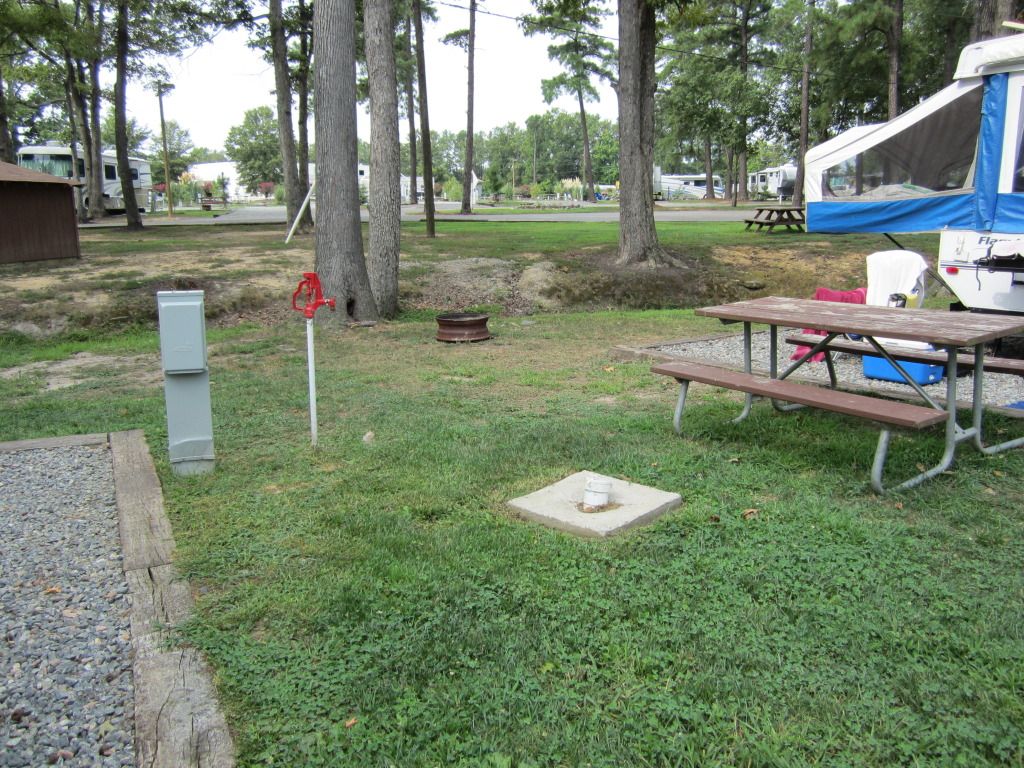
The sewer connection is a four inch pipe in the ground - usually plastic pipe - with a screw on cap. Always keep a box of latex surgical gloves (or the non-latex gloves if you have an allergy to latex). You can get these in boxes of a hundred in many places. Put on a pair of the gloves - remember what you are dumping through that hose that you will be holding. If you don't have a sewer connection at your campsite then there will be a dump station at the campground (or at various other places) for everyone to use. Usually there is one - and you can expect to wait in line for your turn. At these there may be a large metal plate in the ground covering a large open hole. Don't fall in. (You are laughing but in the next county to us there is a free public dump station at a sewage disposal plant, and there are large open manholes in the pavement to dump into - and one wrong step and you are down and dirty and likely to drown or wish you did.) The sewer connection at your campsite is much safer and much more pleasant. It is well worth the extra few dollars a night to have a site with your own sewer connection. OK - go over to the sewer pipe, unscrew the cap, and put the cap on the side. Remember what everyone else has been pouring around this hole and mind where you step (at least be aware of the possibility that it is not necessarily the cleanest spot in the campground).
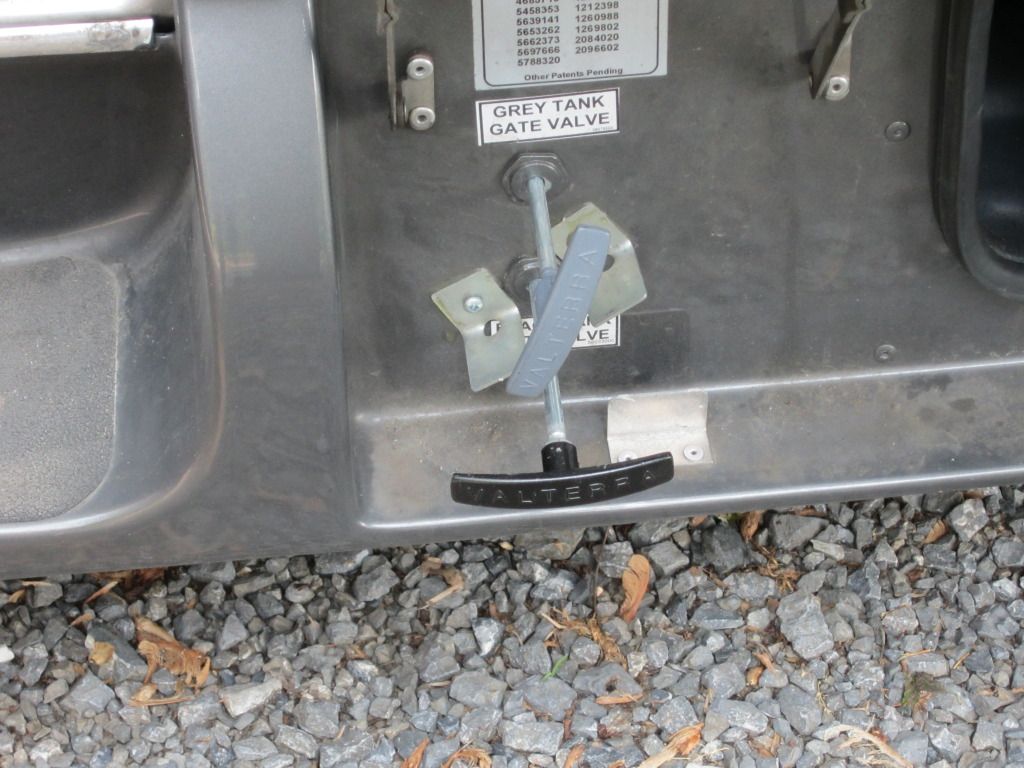
Now, it gets really fun. Go to your Roadtrek and open the black tank valve by pulling the black handle - a newer Roadtrek will have color coordinated handles. I have heard that there are some older ones that have handles that have no difference in color - both black, both grey. The handles are easy to change and you can buy ones in black or grey at RV supply stores. A newer Roadtrek also has a label printed next to each valve. So easy. Below is a photo of our valve compartment.
![]()
What you see in this photo is both valve handles open. I will explain this later. Now, you only want to pull the black handle to open the black tank.
YOU ALWAYS DUMP THE BLACK TANK FIRST -
no matter if you have a gravity system or a macerator.Dumping a Roadtrek with a macerator is a two person process. I will explain how one person can do this later. For now let's assume you have a partner to do this. This is one of those togetherness things that couples enjoy. And in the tight quarters of a Class B RV you have a lot of togetherness moments.
One person is now going to take the nozzle connected to the green hose (some older Roadtreks have different color hoses and those hoses had problems breaking - Roadtrek has since about 2008 replaced the hose with a durable hose) and bring it over the the sewer hole. Hold the end of the nozzle into the hole - you do have to bend to do this (can't bend - don't worry - I can tell you what to do). Turn the black handle on the nozzle so that it points to the opening of the nozzle - open position - look at the photo a few paragraphs back to see the nozzle in the open position (we keep ours that way all of the time - I will tell you why later).
You now give your partner the GO signal that you are ready for the sh.. I mean waste to start to flow and your partner will press the red button that is inside the driver's door. Push and hold that button - for now.
The motor of the macerator will start and you will see the hose contort a bit as it fills up and then it all flows out the end of the nozzle into the hole - hold it down enough into the sewer hold to avoid splashing on you. (I know you are saying ycch! Really, it is not bad at all if you do it correctly. We really were pleasantly surprised the first time we did this. ) You will get a full flow at first - and generally it is almost clear water and then the water turns dark brown - you really don't have to look.
![]()
Here is Meryl with the nozzle in the sewer hole. Yes, this is her job. I am at the button. She is holding the nozzle a bit high and this is JUST for the photo so that you can see what to do. See, she is wearing rubber gloves. She also has on her "OK to get wet" shoes though she really does not want to get them wet here doing this. Keep the button pressed until only spurts are coming out of the hose. At this point the black tank is as empty as it needs to be. Roadtrek and the macerator company say that you will hear a change in sound made by the macerator motor when you should stop. It is supposed to make a high pitch whine - a change in tone from the regular sound. We don't really hear that. We have been told that it is definitely different in tone. As soon as water is down to those spurts stop. At this point we have been letting go of the button and then pushing it again and another stream of water will come out - but we have been learning that this is not a good idea - so AS SOON as you see the water flow slow down to spurts,
STOP.
If you run the macerator motor when it is dry you will burn it out! You have now emptied the black tank - one more tank to go!
The rest is simple. Have your partner at the button pull out the grey handle. There are a lot of varying opinions about closing the black handle now by pushing it back in, leaving it open while you dump the grey tank, or opening the grey handle, allowing a little water from the grey tank to back flow into the black tank and with the soapy water cleaning that tank a little. We have tried it all. At the moment we are leaving the black handle open (pulled out) while we are dumping the grey tank (grey handle pulled out). This is a common suggestion in this process and unless we encounter some problem after having done this for a year now, we will follow the common trend. Basically, you can dump the grey tank with or without the black handle open.
The reason that you are dumping the grey tank last is that you do want that soapy water to follow that black water and clean out the macerator and the hose - and almost three times the amount of water is going to come through the grey tank and out the hose.
With the grey handle pulled out - repeat what you did for the black tank exactly the same. Nozzle into the sewer hole, push the red button, and the grey water flows out into the sewer. The grey water looks either clear or grey depending upon how much soap went down the drain. It can also be bubbly from the soap - but not always. Again, hold the button down until the water starts to spurt and then stop. The grey tank is as empty as needed.
At this point push in the grey handle and push in the black handle. Your waste tanks are empty. But that is not always the end of the process I am sorry to say. You can stop here if need be. This is what the problem COULD be. The tank monitor sensors are notoriously inaccurate. They can be made inaccurate, particularly in the black tank if something has caught on one of them - like toilet paper and causes it to make incorrect contact and result in reading as if there was water on it and the tank is full to that level. You could have an empty tank that still reads 2/3 or even Full. You know it is empty - you just emptied to the point of nothing more coming out. But that monitor panel is saying something else. What a pain!
Here is what you can do - which sometimes works and sometimes doesn't and is recommended anyway. You are going to flush the black tank with clean water and empty it again. I have done this two ways. One way with my gallon jug and I fill and dump ten gallons of clean water down the toilet letting it rush into the toilet hole with a little force from gravity (it will splash a little as you do this). I also purchased a tank cleaning wand - for the Roadtrek you must have one with a FLEXIBLE HOSE END - that is a rigid wand with a flexible hose at the end about two feet long and the end of that has either multiple small hose for water to come out or a spinning brass end that swirls water around. You connect this wand to a garden hose - you can see my olive green coil hose in the first photo in the compartment (sold at all of the home stores and Walmart in the summer).
NEVER USE A FRESH WATER HOSE FOR THIS! There is a shut off valve on your end of the wand. Turn the hose water faucet on full, wand valve OFF, and put the end of the hose into the toilet. Open the toilet valve with your foot and BE CAREFUL NOT TO LET THE TOILET VALVE CLOSE ON THE WAND OR YOU WILL DAMAGE THE TOILET! Snake the end of the flex hose all the way down into the black tank. Yes, when it come out it will not be very pleasant and you need to wear latex gloves for this job and have disinfectant cleanser and paper towels on hand to clean this wand before you put it away. The wand acts like a pressure washer and you move the wand around so that it gets to every part of the tank - up and down, around and around. Anything clinging to a sensor or the tank walls will be knocked off - and all of the water going in is clean. You want to fill the tank with this now until it is at least 2/3 full. When it is full completely, you will see water come up the drain pipe toward the toilet. Stop by shutting off the valve on your end of the wand. Get the wand outside to clean it so that you don't mess up anything inside your Roadtrek.
Now, go back outside and dump your black tank only all over again. Just as you did before. Roadtrek does recommend flushing the tank every time you dump it. When you are done, and you allow the tank to dry out a little you will actually see the monitor panel read empty - if you are lucky.
Now, it is time to put away your macerator hose and finish up. First, close the sewer hole by screwing the cap back on. Keep those gloves on! Next, leave the nozzle valve OPEN. This is to allow air to escape from the macerator hose when you bend it and cram it back into its compartment. This compartment is a TIGHT fit. A few more inches would have done wonders. Push the hose back in - back end first and just keep pushing and fitting the hose in until it is all inside. Now, take the nozzle and push that in with the nozzle opening facing UP. At this point you could turn that black nozzle valve closed, but we have found that it fits inside much better with the nozzle valve handle straight to the nozzle and not across as it is in the closed position. It is also much easier to get out this way. Clean your wand and put it away - ours is in a large plastic bag in the side storage compartment and it is a pain and always in the way- but this is the best place so far we have found to keep it.
You are almost finished. Go inside the Roadtrek and pour a gallon of clean water into the toilet and let it go down into the black tank. You might add the deodorizer/digester chemical of your choice to the water now too. YOU MUST ALWAYS HAVE WATER IN YOUR BLACK TANK! You never want it to dry out or you will have big problems. When it comes to your black tank, water is your best friend - and plenty of it. Now, you are finished. The whole process can take us about 45 minutes and that is only because of the time needed to flush the black tank. If we are not flushing - like at a public dump site - it takes us about 15 minutes to empty both tanks - or less. It really goes fast.
Now -
some extras!You say - "I don't want to stand and look into the sewer hole holding the nozzle!" or you say - "I can't bend over the hole to do this!" or you say -
"I am all alone, now what do I do?!". Well you have a solution - the same one for all three - you use two donuts.
Uhhh? I eat two donuts and this solves all the problems. No. An RV donut is a small rubber plug with a hole in the middle. You can buy these at RV supply shops or ... yep! Walmart. You need two different sizes and Roadtrek is nice enough to include one that fits their macerator hose nozzle with your new Roadtrek. This is a hard rubber plug. The problem though, is that the one that comes with the Roadtrek is too small to fit into the usual sewer pipe opening. The one in the stores fits these sewer pipes perfectly. The one from Roadtrek fits inside that donut perfectly. I did find that once joined together it is hard to get them apart. You don't need to get them apart but you cannot fit the nozzle back into its compartment with one or both of these attached to the nozzle. The easy fix is get some KY jelly - a water soluble lubricant at your pharmacy or pharmacy department. Put a little on the nozzle and a little around the Roadtrek donut and then put the Roadtrek, smaller donut into the hole of the larger donut, and then put the nozzle into the center of the Roadtrek donut. Now, push the larger donut into the sewer hole - no lube needed. It should stick in easily and NOT fall in. Now, you can walk away from the sewer hole with your macerator nozzle attached to it and go push the button yourself. You are not near the sewer hole. You can't smell the sewer hole. You can't see into the sewer hole - which can be a good thing but is also a bad thing because you now have no visual on the water stopping when the tank is empty. Now, you must rely on the sound. As they say, a change to a high pitch whine and it is empty. You will just have to accept that. Once the donut comes out of the sewer hole, disinfect it with a disinfectant cleaner. Put it into something that will keep it away from your fresh water hoses. We have a plastic box for the "dirty" things that we want to keep separate in that side compartment. By the way, there are some campgrounds that require that you use a donut when dumping. It is simple to use - as I have described and you should always have one in your Roadtrek that will fit the standard dump pipe, in addition to the smaller one that Roadtrek gives you. (If you lose that smaller donut or need to buy one you will find them at shops at dealers who sell Roadtreks but they are not cheap. The larger one is just a few dollars. You need BOTH.)
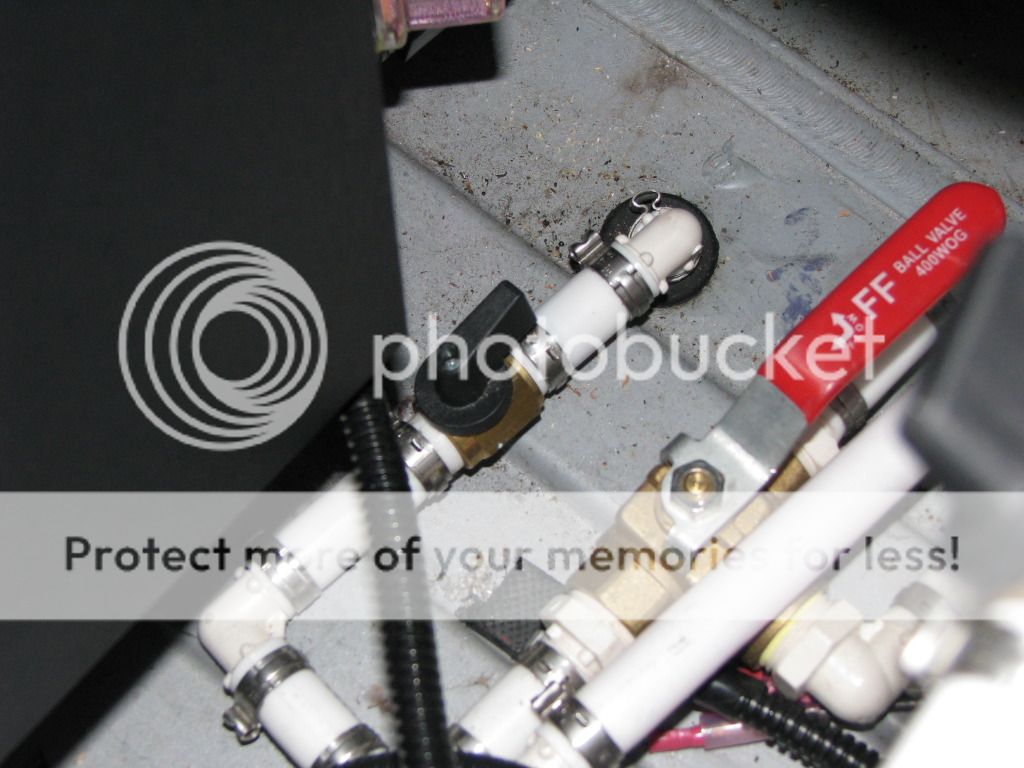
OK - what can go wrong? A macerator is a machine and like any machine, some can come out of the factory defective, some can break down, and some last forever. There are some Roadtrek owners that report many problems with their macerators. There are many more Roadtrek owners who never have a problem at all with the macerator. I have spoken to Roadtrek-trained technicians who have said the problems that they see with macerators are the result of hair being caught in the impeller or people who have not put enough water into their tanks. But what happens if something does go wrong. First, there is a manual crank for the macerator that will unstick something that may be stuck inside that is keeping the impeller from turning with the motor. There is a handle that is located below the Roadtrek chassis - on mine it is below the driver's door. The handle is connected to a long bar that goes into the macerator. To use this handle you must go under the Roadtrek to get to it and to turn it. You push it in to engage a screwdriver type blade on the end into a slot inside the macerator's shaft. You then can turn that shaft to free it if it is stuck- you must always ONLY turn to the right.
I recently emailed Roadtrek customer service about something unrelated to the macerator and in the reply I was told that to keep the macerator in good working condition, the manual crank should be turned BEFORE EVERY DUMP to make sure that the impeller and shaft are turning freely. This is very likely a good idea, but this added step to dumping the tanks would require one to crawl under the Roadtrek and get to that crank handle each time you are about to dump the tanks. We have not yet done this - but we may. A little prevention may mean saving a lot of inconvenience. I did check about this with the service tech at our dealer-service and he did agree that it is a good idea. If you know that the shaft is turning freely, you know that there will be nothing that could jam and burn the motor.There is also an emergency clean out on the macerator. This is a cap that must be opened (unscrewed) - again underneath the van - and then when you open the grey and black valves the tanks will gravity dump out the clean out. This can be very messy as it just dumps the contents of the tanks down on the ground below it - there is no way really to get this over a dump hole. Someone that I know with a Roadtrek has invented a way to connect a traditional gravity hose to this clean out, but the connections come too close to the ground and they cannot be permanently attached. This is a temporary solution only, but one that will allow a traditional gravity dump into a sewer hole in an emergency. It is nice to know that this is possible. Some people will not put toilet paper into their toilets believing that it is the toilet paper that jams the macerator. The company that makes the macerator insists that it can grind much more than toilet paper. Of course, you always must use toilet paper that will dissolve in water to a slurry in a very short time. Take a piece of toilet paper and put it in a glass of water. After a minute or less, swirl the water around and the toilet paper should be gone into miniscule shreds and then gone all together. You can use RV specific toilet paper which is expensive or you can use any toilet paper that passes the test that I have described. We use Scott single ply household toilet paper and it works fine. I did not pay what I paid for my Roadtrek not to put toilet paper down the toilet and to collect it in a bag hung on the bathroom door. Remember, as I said, use plenty of water in your black tank. Of course, there are things that cannot go down the toilet - leftovers, sanitary napkins, tampons, condoms, paper towels, sanitary toilet wipes, paper napkins - use common sense. If it does not dissolve it cannot be flushed.
That now is really all there is to it. It is a nasty job but it must be done. BUT it is not so nasty with the Roadtrek macerator. Oh, and when you are done. Throw away the gloves and wash your hands - really, really well.
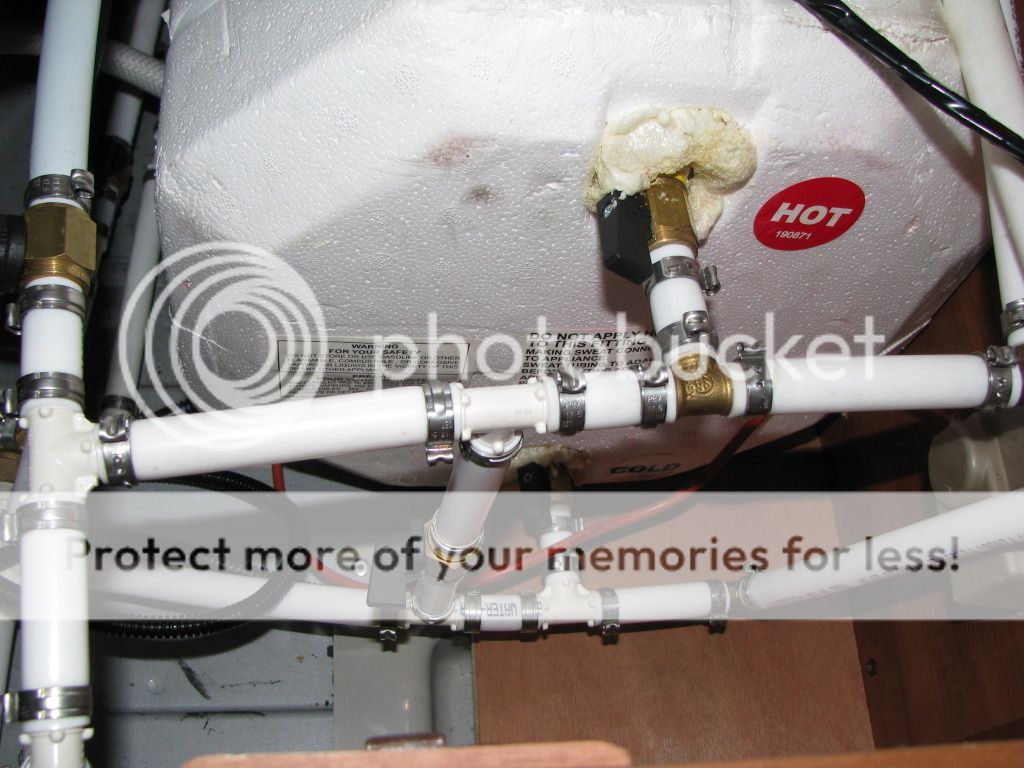 The Roadtrek has a propane hot water heater to heat your hot water and a six gallon hot water tank to hold that water and keep it hot. Inside you can see the tank inside one of your cabinets - mine is in the first cabinet on the driver's side under the bed. You will know it is your hot water tank because it is covered in white foam. This is the tank from the inside of the Roadtrek. The hot water heater and tank are actually accessed from the outside of the Roadtrek on the driver's side.
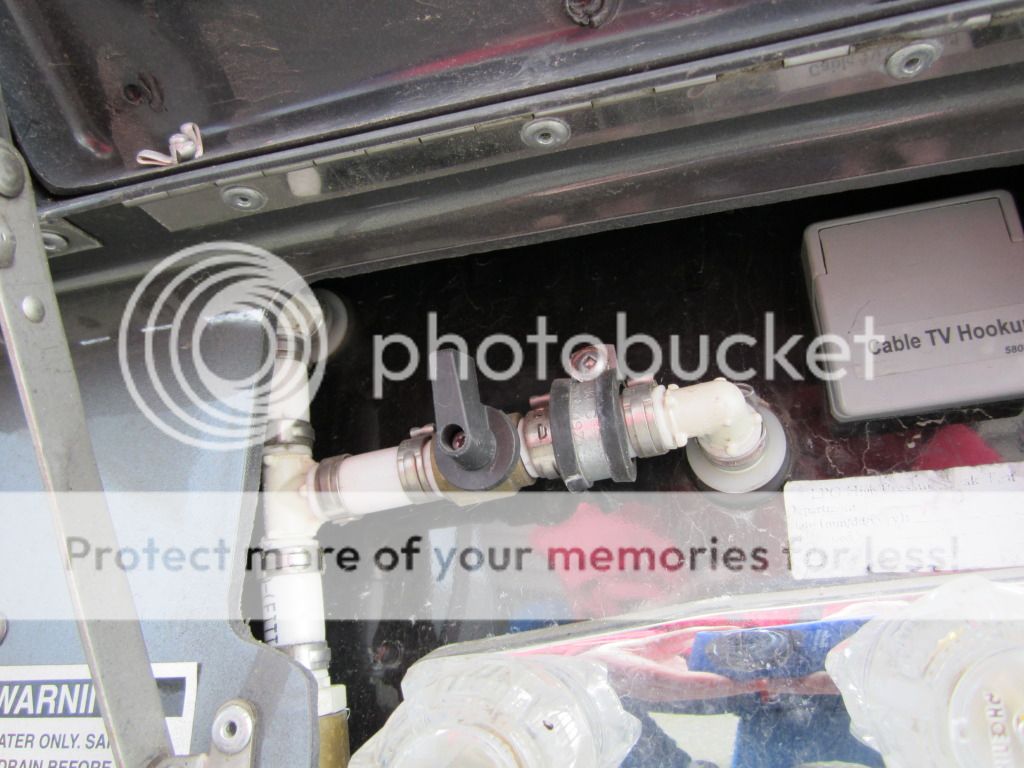
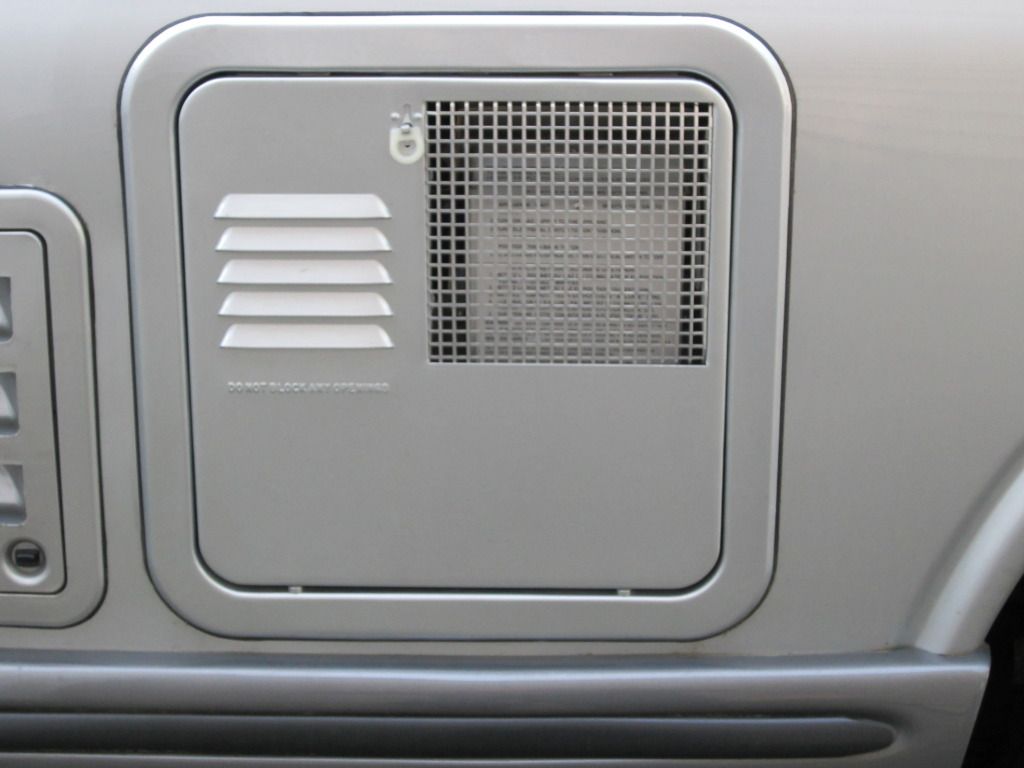 driver's side of the outside of the Roadtrek you will see a panel with a mesh screen in the upper right corner and vents next to that. In between the screen and the vents there is a little ring. The ring is the latch that holds this panel tight to the body of the Roadtrek. By flipping that ring up and turning it so that the ring is vertical, the panel can be pulled out from the top edge and the ring will slip through a slot that is behind it. When you open this panel, put the door in a safe place. You have now accessed the water heater and the water tank.
 What you see in the photo above is the hot water heater and behind that is the tank that you saw inside. You can access the heating element and the interior of the hot water tank through this panel compartment.
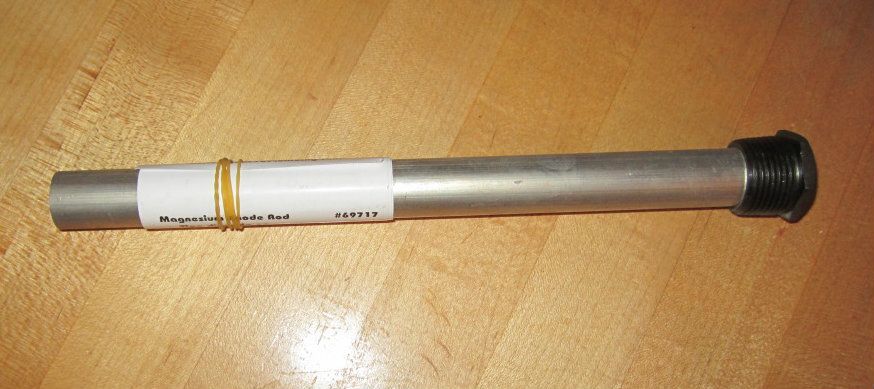 Above is a picture of a new anode rod for a Suburban hot water heater. The Suburban rod is longer than the Atwood rod. It is made of either magnesium or aluminum. I am told that the one that comes in the hot water heater is magnesium. The magnesium rod and the aluminum rod are both supposed to work the same. Of course, the paper and the rubber band come off before it goes into the hot water heater. You can purchase these at any RV supply shop. This one came from the shop at my Roadtrek dealer. It is something that you should buy in advance and keep a spare to save a trip to find one when you need to change the one in your hot water tank.